
GoPro Stand On A Budget
GoPros footage of rowing is everywhere these days. Pictures and videos can be found from cameras mounted on drones, oars, or even a coxswain's head! If you spent any time around the Head of The Charles this fall you would have seen at least a dozen different contraptions to mount a GoPro to a shell. These contraptions ranged from the professional to the “less effective.” Most coaches lack a ton of expendable income. As a result I wanted to produce a cost effective GoPro mount that was cheaper than a professional mount, yet more effective than "others".
There are a million different designs for GoPro stands or mounts. I chose following criteria for my design:
Purchased materials:
Common boathouse materials:
Tools:
There was a lot of trial and error in creating this mount. This set up may not work for everyone, but I found it to be the best overall solution for the given criteria.
Step 1: Cut your materials
1- 5” piece of 2x4
2- 48” pieces of pvc
1- 50” piece of pvc
1- 16” piece of pvc
1- 15” piece of pvc
1- 12” piece of pvc
Step 2: Assembly
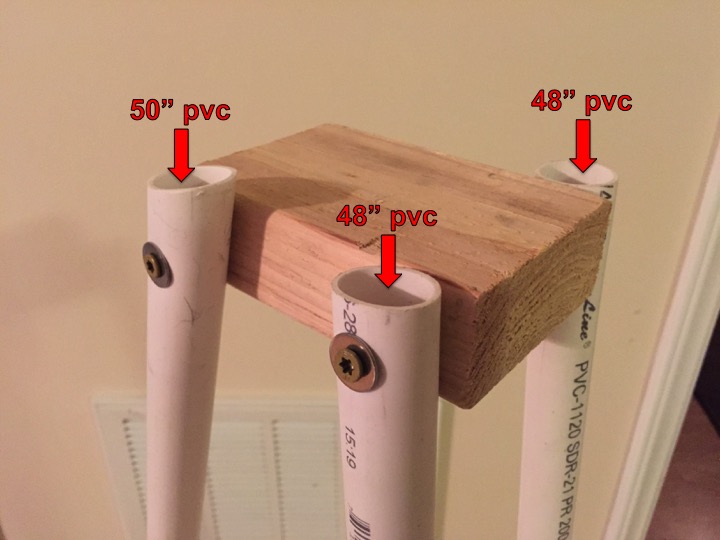
Pre-drill a hole through the ends of the 2-48” pieces of pvc and 50” piece of pvc about 1” from the edge. Use a 1/8in drill bit or use a drill bit the same size as the screw you are using. The pvc will form the legs of the stand. Place a screw through a washer and screw the two 48” pieces of pvc to opposite sides of the 2x4. Now screw the 50” piece to one of the back corners of the 2x4. See the photo below:
Step 3: Adding supports
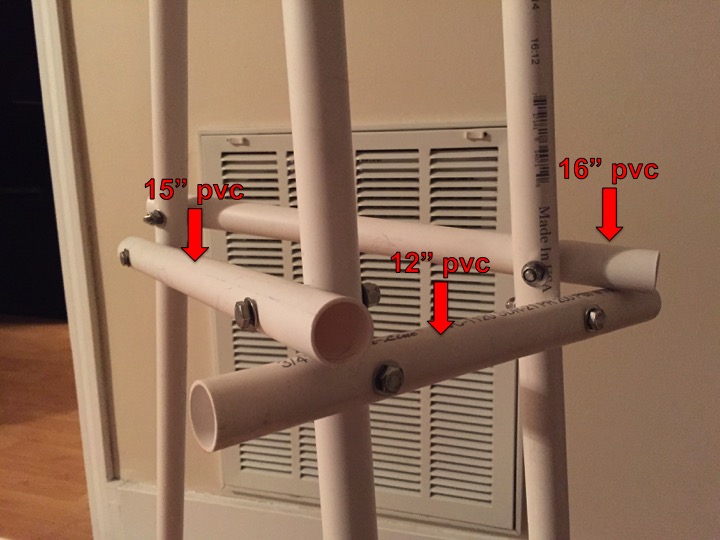
Now collect your short pieces of pvc. The 12” piece will go across the front of the mount about half way down the stand. The 15” and 16” pieces will go along the sides. Use a ¼ inch drill bit to drill through both ends of the short pvc pieces about 2” from each edge. Line up those holes with the long pvc pieces (the legs of the stand) and drill through the long pvc legs. Secure the two pieces of pvc together with the 2.5” bolt, two washers, and nylon nut. I am not including exact measurements for this step since the shorter pieces of pvc are only in place for support. It doesn’t necessarily matter where they are on the stand as long as they are there.
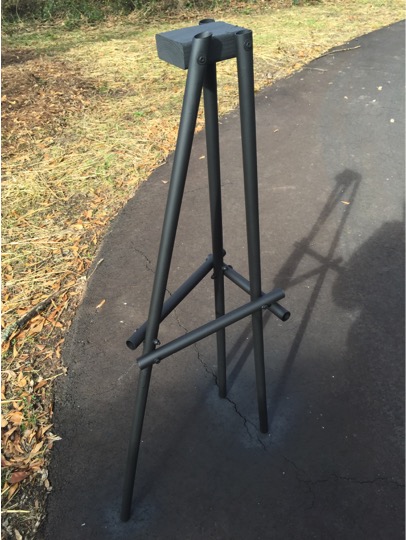
Painting: (optional)
I chose to paint the stand a flat black simply because I thought it would make it look better. If you want to save 4 dollars, this step really isn’t necessary.
Attach Section Cups:
I purchased my suction cups from Lowes since they were readily available. I have not tested these suction cups on the water however they seem to have a fairly strong hold. I have tested the suction cups from GoPro and I know they will withstand a race. The only problem with the GoPro suction cups are they cost about 6 times the price per suction cup compared to the suction cups from Lowes. Ebay may be the best route to go if you don’t trust the Lowes suction cups or if you simply want the fexability to attach you GoPro on other parts of the shell (they are nice to have).
Stern decks vary in shape and size depending on what type of boat you are rowing. To make life a little easier, borrow a friend to hold your stand over the stern deck of the shell that you are trying to secure the camera to. Place the suction cups on the deck at the feet of the stand that you just built. Drill a hole through the suction cup handle and the legs of the mount using a ¼” drill bit. Secure the handle and the pvc leg to each other using a 2” bolt, 2 washers, and a nylon nut. Repeat this for all 3 legs.
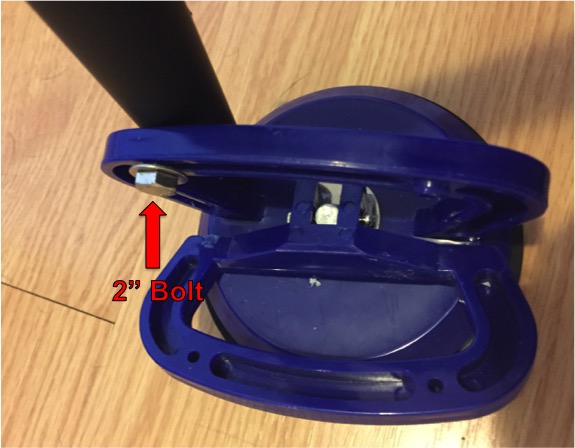
I am only using one bolt per suction cup to allow for various stern deck angles. This way the suction cups can change angles slightly if necessary.
Secure your GoPro:
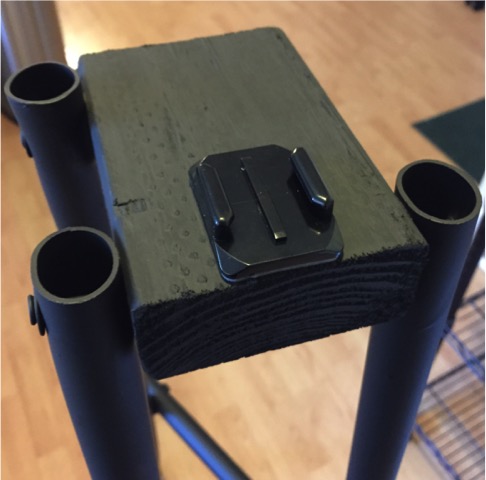
I did not include this in the list of material however when you purchase a GoPro, it comes with a handful of adhesive connector pieces. Secure one of these pieces to the front of the 2x4. Now you can attach your GoPro to the connector.
Attach your tripod to the shell:
Make sure the suction cups and deck of the shell are clean and dry. Attach your creation to the stern deck of your shell. If you are using this device during practice, I would recommend attaching a safety cable just in case the suction cups come undone. If you are using this stand during a race… if it falls off, it falls off. I would not attach a safety cable. Most teams would not want to lose a race because a giant anchor was hanging off of the back of their boat. The block of wood and the PVC should provide some buoyancy so you can recover the camera after the race. The floating backpack that GoPro sells will do next to nothing if something else is attached to the GoPro. The floating backdoor can only support the camera. If you are using just one of the suction cups from GoPro with the floating backdoor and it falls in the water, it will sink.
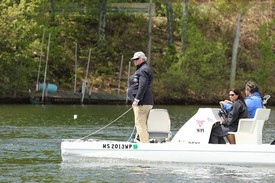
Check out your results:
Results may vary, but I am pretty happy with the outcome. Don't be afraid to modify the design to fit your situation. (I found the pvc could use a little more stiffening so I zip tied some of the extra pvc to the legs.)
If you have made a custom mount for your shell, please share! This was just one example of the many possible attachment systems. You can spend a lot of money or you can spend very little (This set up cost $35 for everything). Happy filming!
If you enjoy and rely on row2k, we need your help to be able to keep doing all this. Though row2k sometimes looks like a big, outside-funded operation, it mainly runs on enthusiasm and grit. Help us keep it coming, thank you! Learn more.
Comments | Log in to comment |
There are no Comments yet
| |
- Bont Rowing
- Calm Waters Rowing
- Concept 2
- Craftsbury Sculling
- The Crew Classic
- CrewLAB
- Croker
- Durham Boat Co.
- Empacher
- Faster Masters
- Filippi
- Fluidesign
- h2row.net
- HUDSON
- Live2Row Studios
- Nielsen-Kellerman
- Oak Ridge RA
- Peinert Boat Works
- Pocock Racing Shells
- Race1 USA
- RowKraft
- Rubini Jewelers
- Vespoli USA
- WinTech Racing