
The Skeg Re-Thread
row2k hackers
With April showers washing a lot of debris into rivers and lakes, this may well be the cruellest month for the skegs of the rowing world--making this month the perfect time to consider this cool how-to, submitted by guest hacker Matt Hopkins.
Hacker Hopkins is talking mostly about Vespoli fins herein, but he's got a few suggestions here that would work for skegs of any ilk--and plenty of photos to explain the process on his website if you follow the link at the bottom.
Many thanks to Coach Hopkins for the knowledge, and for contributing this hack to the column.
Vespoli Fin Repair, by Matt Hopkins
This is a great solution to an expensive problem.
We all know the headache of novice crews knocking their fins off on the dock, putting their boat in slings, or while loading the trailer. At $35 a pop, this can be an expensive habit and it is often tough to keep a spare fin at the ready in a large boathouse.
Step 1: The first step in this operation is recovery of the fin. Fins broken off on land are obviously easy to recover. Those that shear off out on the water or even at the edge of the dock are a different story.
For these, try this trick: With the fin off of the boat, drill a small hole through the fin (from side to side) about 1/4” from the top and about 1/4” to the bow of the aft most brass stud. Then tie a fishing line tether (about 2 feet long) through the hole, knotting it off up on top of the fin. Thread the line up through the aft-most hole in your hull and tie it off to the rudder tube inside the hull. Then drawing the line tight, install the fin.
Done properly, you will barely be able to see the fishing line on the fin as the knot will be buried between the hull and the fin. For those worrying about drag, the fin is so far back from the bow of the boat that by the time the fin passes through the water the layer of disturbed water is so large that a thread of fishing line is not going to make a difference.
Now, when your crew either knocks off the fin while rowing, or takes it off on the dock, the fin will dangle from the boat by its tether. A swift yank will snap the line and remove it either for the row back to the dock or for the “walk of shame” back to the boathouse.
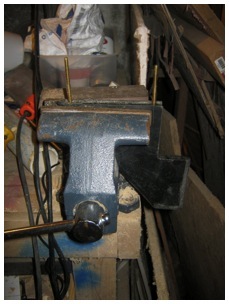
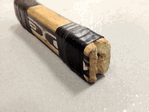
Step 2: Set the recovered fin in a vise and with a power drill and a 7/64” drill bit, drill a hole about 1/4” down into the center of the broken off stud. This can be tricky and takes patience and a steady hand. But the brass is soft and with a good vise it won’t take long to master the task.
With a hole down the center, remove the remains of the stud using a #1 screw extractor. A screw extractor is a nifty tool that has left-handed spiral flutes on it that gets twisted into the hole in the stud. As the flutes grab into the soft brass, the stud starts to twist out of the plastic fin.
This part, too, is tricky as it requires that you press quite hard down onto the extractor as it turns in to make sure that it grabs and does not strip the inside of the hole. It is a bit counter-intuitive to press down hard to get something to come up, but it is no different from removing a tough screw that is at risk of having its head stripped.
If you do strip it, don't fret: there is still hope. A # 2 extractor will now fit into the enlarged hole and do the same job.
Step 3: Now replace the damaged stud with a 4" long 10-32 brass stud. You can cut these yourself from bulk brass-threaded rods, but McMaster-Carr (the online hardware emporium) has them pre-cut (they also sell drills, screw extractors, and the tap wrench that you will need for it).
You can chuck the new stud right into your drill and thread it in quite quickly that way. Be careful though, and be sure to slow down when you approach the bottom of the hole so that you don’t strip the hole or damage your threads.
All told, if you have none of these tools or materials on hand, getting set up for this will cost you:
- #1 screw extractor, about $3.21
- 5/64 drill bit, about $1.32
- T handled tap wrench, about $5
- Pack of 10, 10-32 4” brass threaded rods, about $10
- Total cost to repair/rebuild up to 10 fins (min of 5 fins if you always break both rods): $19.53, or so
P.S. Life gets even easier when you encounter a stud that you have already replaced. They come out so easily that you almost don’t have to use the extractor; the drill alone can sometimes do the job as you back the drill out of the hole you make in Step 2. If your holes start to get “loose” after years of replacements (and there are fins on our novice eights that I must have rebuilt at least 10 times in my 27 years of doing this), then you can solve that problem by drooling a few drops of 5 minute epoxy down into the hole right before you thread the new rod in. Put a very light coat of oil/WD40 on the new rod to make sure that it doesn’t get too tightly bonded in by the epoxy, and you will be all set.
For more detailed pictures on this hack, check out Matt's how-to page on his website, www.rowersresource.org.
Have a better way to save the skegs your coxswains speed through each spring? Let us in on your tips--and hacks--in the comments below.
Don't forget: if you have a great rowing hack for future inclusion here, make sure you send it to us!

If you enjoy and rely on row2k, we need your help to be able to keep doing all this. Though row2k sometimes looks like a big, outside-funded operation, it mainly runs on enthusiasm and grit. Help us keep it coming, thank you! Learn more.


Comments | Log in to comment |


- Bont Rowing
- Calm Waters Rowing
- Concept 2
- Craftsbury Sculling
- The Crew Classic
- CrewLAB
- Croker
- Durham Boat Co.
- Empacher
- Faster Masters
- Filippi
- Fluidesign
- h2row.net
- HUDSON
- Live2Row Studios
- Nielsen-Kellerman
- Oak Ridge RA
- Peinert Boat Works
- Pocock Racing Shells
- Race1 USA
- RowKraft
- Rubini Jewelers
- Vespoli USA
- WinTech Racing
02/28/2013 11:22:18 PM
04/20/2012 7:57:05 PM
04/19/2012 12:59:55 PM
And when you replace the fin, never, ever, ever, ever use silicone or glue. It doesn't come off, attracts dirt, and makes a mess. Use "plumbers putty" instead. Roll a bit in your hands to warm it up, make a small pyramid around the base of the stud and tighten the fin down. Just rub off the excess and it won't leak. Vespoli stern tanls very rarely leak through the fin studs, so silicon won't help there anyhow. They leak through the rudder post from bouncing the rudder yoke on a cross bar when racking the boat or from hitting an object. But that's another hack. -JD