
The following is excerpted from a new article on MaxRigging.com; read the full article here.
Often we have to row with marginal equipment. Making the best of what we have at hand.
Making do, if you will.
However, bad things can happen when we make do - such as sub-par rowing, rowers getting frustrated - possibly injured, and the well-crafted plans of coaches never get realized.
When the equipment is better, that is when everything can be better:
- rowing improves
- rowers excel
- coaches exhale
- the person responsible for the rowing equipment, oh yeah…they are happy campers. So happy you may actually see them smile.
There are reasons why rowers slog along in marginal equipment. For instance, the people responsible for rowing equipment could be:
- strapped for time, or
- short on money, or
- without a plan for improving the rowing equipment.
Or commonly, all of the above.
Let's Change That
In this time of uncertainty, angst and when every penny counts, how do you do that?
Fire up a simple-four-phase plan, that's how.
Four Phases to Row Better Equipment
I present you with four phases. They are separated by the resources you need to invest.
Yep, you can certainly jump into any phase at any time.
Yet if you start at Phase 1 and work your way forward in a methodical manner you'll get the greatest reward for your time and effort.
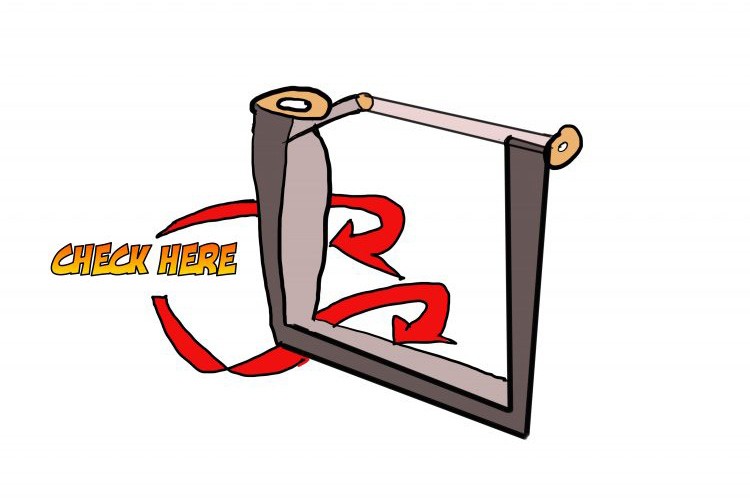
Step 1) Clean and Disinfect
First, clean what you have.
Cleaning improves the function of the equipment by removing dust, dirt, scum, and grime.
Prime areas to clean are:
- Seat tracks and wheels
- Erg/oar handles
- Boat hull
- Oarlocks and oar collars
A side benefit of cleaning is it gives you an opportunity to assess the equipment (which we'll discuss in a second).
Second, disinfect - which is not the same as cleaning. Disinfecting reduces the possibility of disease transmission. When disinfecting, you are focusing on the areas that humans touch.
Such as:
- Erg/oar handles
- Seat tops
- Foot stretchers (shoes and hardware)
- Track stern stops
- Coxswain controls
Any place a human touches you disinfect.
Step 2) Inspect and Replace
Numerous parts in rowing are subject to wear-and-tear. They parts are usually the first parts to break or wear to such a point that they negatively impact the rowing.
I'm talking oarlocks, oar grips, shoes, seat wheels, tracks, rudder cables, straps, slings.
Let's use an oar lock for example. Grab a new oarlock and compare yours to the new one. Look at and feel the surfaces, smooth and level? Or rough and bumpy?
Another quick example - the seat tracks. When they're not constantly cleaned the action of the seat's wheels upon dirt in the track (from shoes worn into the boat) can significantly cut the functional life of those tracks.
Step 3) Measure and Adjust
the next phase is about measuring and adjusting the equipment so that it comfortably and effectively fits the person using it.
A simple action plan for this phase is to:
- Measure your equipment
- Determine where the adjustments should be for the rower/team using it
- Make the appropriate adjustment
Step 4) Evaluate and Replace
In this final phase you are going to determine if the equipment is the RIGHT equipment. A prime candidate for this phase would be boat size.
Let's say you have a men's lightweight hull designed for an average weight of 160-180 pounds. However, the crew rowing in it are women lightweights with a boat average of 130 pounds. The hull is not right for the crew—being designed for a different average weight.
Sure, you can make do, you might HAVE to make do. But to get the crew to row better equipment you will need to replace the boat.
Another example - take your oars.
Possibly the blade shape you have is best suited for a catch-centric style. Yet your focus is on the release. Your oars are not RIGHT for you. Again, you can make do, you might HAVE to make do.
But to get the crew to row better equipment you will need to replace the oars.
Find Your Way to Better Equipment
You'll probably have to make do with what you have. But that doesn't mean you can't find your way to better equipment.
You can find your way.
Start simple. Move smartly. And have a plan.
That's how you'll get people to row better equipment.
To learn more about rigging, check out Mike's new online course, Beginning Sweep Rigging, which launched this week. <
If you enjoy and rely on row2k, we need your help to be able to keep doing all this. Though row2k sometimes looks like a big, outside-funded operation, it mainly runs on enthusiasm and grit. Help us keep it coming, thank you! Learn more.
Comments | Log in to comment |
There are no Comments yet
| |


- Bont Rowing
- Calm Waters Rowing
- Concept 2
- Craftsbury Sculling
- The Crew Classic
- CrewLAB
- Croker
- Durham Boat Co.
- Empacher
- Faster Masters
- Filippi
- Fluidesign
- h2row.net
- HUDSON
- Live2Row Studios
- Nielsen-Kellerman
- Oak Ridge RA
- Peinert Boat Works
- Pocock Racing Shells
- Race1 USA
- RowKraft
- Rubini Jewelers
- Vespoli USA
- WinTech Racing